https://www.puregym.com/blog/calisthenics-workout-guide/
Medical Disclaimer:
I’m not a personal trainer. I based everything in this article on my personal experience with calisthenics and publicly available fitness research. Before starting any new exercise program, consult a qualified doctor or physiotherapist.
This is especially important if you have injuries, joint problems, or health conditions. Your safety comes first.
Who This Article Is For (And Who It’s Not For)
This guide is for your calisthenics workout plan for beginners at home if you have never done structured exercise. It is also for you if you tried and quit. It is for you if you are coming back after months or years off. It’s also for you if you genuinely cannot afford a gym right now or simply don’t want one.
This is not for someone already doing pull-ups and muscle-ups. If you’re there — respect — but this isn’t your article.
If you’re a total beginner and want a simple at-home calisthenics plan, you’re in the right place.
You don’t need abs yet.
You also don’t need to know what “progressive overload” means.
Introduction: The Bedroom Corner That Changed Everything
I still remember moving the laundry basket. Shoving a pair of trainers under the bed. Clearing about two square meters of floor in my bedroom and thinking — okay, this is my gym now.
Then I dropped to the floor and tried a push-up. I got through four.
On the fifth, my chest hit the floor and I just… stayed there. Face down. Breathing. A little embarrassed even though nobody was watching.
That was three years ago. Today I can do sets of 20 push-ups, pistol squat progressions, and a 60-second hollow body hold.
Same bedroom. Same two square meters. No gym membership. Ever.
The difference wasn’t motivation. It wasn’t even the exercises. It was having an actual plan.
That’s what this article is. The plan I wish someone had given me before I wasted almost three months.
I watched random YouTube videos. I did whatever workout felt fun that day. I wondered why my body wasn’t changing at all.
Let’s fix that for you right now.
What Is Calisthenics? (The One-Paragraph Answer That’s Actually Honest)
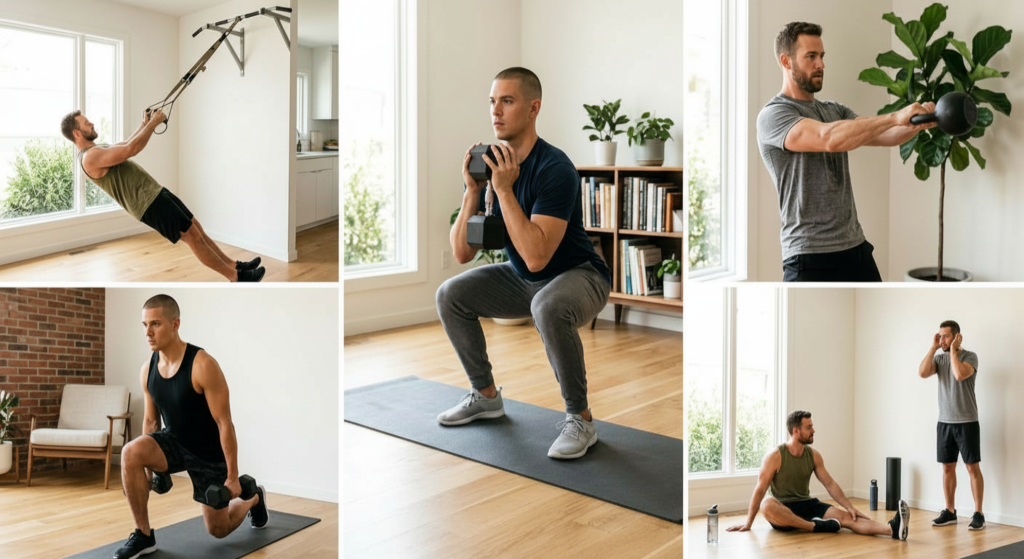
Calisthenics is resistance training using your own bodyweight. No barbells. No cable machines. No gym membership. Just you, gravity, and floor space.
It includes moves like push-ups, squats, lunges, planks, dips, pull-ups, and hollow body holds.
These exercises work many muscle groups at once.
They build real functional strength, not just muscles that look good in the mirror.
The reason it works so well for beginners is simple: your bodyweight sets a natural ceiling on how much you can lift. You physically cannot overload yourself the way a beginner at a gym might stack too many plates on a barbell. That built-in limit protects you while you’re still learning.
And here’s something most articles don’t tell you — the early gains in calisthenics come fast. Within the first two to three weeks, you’ll notice you feel stronger.
That’s not placebo. That’s your nervous system learning to recruit your muscles more efficiently. Your brain is getting better at using the muscles you already have.
Is Calisthenics at Home Actually Effective? (The Honest Answer)
Yes. And here’s why that’s not just a motivational statement.
Research in *Sports Medicine* shows that progressive bodyweight training builds muscle and strength like weight training. This works if the movements stay challenging over time. The key phrase there is “remain challenging.” That means you can’t do the same 10 push-ups forever and expect to keep growing.
The second honest truth: calisthenics has real limits. It’s harder to isolate specific muscles. At advanced levels, progressive overload gets more complex.
But for a beginner? You’re not close to those limits. You have months — possibly a year or more — of clear progression ahead of you before bodyweight training stops being enough.
That’s plenty of time to build the foundation.
Before You Start: Know Your Actual Starting Point
Here’s the step that 90% of beginner workout articles skip entirely, and it’s the most important one.
Pull out your phone right now. Open your notes app. And honestly answer these three questions:
1. Can you do one full push-up — chest touching the floor, body straight? 2. Can you hold a plank for 20 seconds without your lower back caving? 3. Can you squat down until your thighs are parallel to the floor and stand back up?
If the answer to any of those is “barely” or “no” — that is your starting point. Write it down with today’s date:
“Week 1, Day 1 — 4 push-ups (knees), 18-second plank, 10 squats. Lower back tight.”
That note is gold.
Four weeks from now, you’ll read it back and feel genuinely proud.
Track every session. No exceptions.
It builds accountability. It tells you when to push harder. And it stops you from doing what most beginners do — training blind and wondering why nothing changes
The 4-Week Beginner Calisthenics Workout Plan at Home
Plan Structure at a Glance
| Detail | Specifics |
|---|---|
| Training Days | 3 days per week |
| Session Length | 30 to 40 minutes including warm-up |
| Equipment Needed | None (yoga mat optional) |
| Rest Between Sets | 45 to 90 seconds |
| Rest Days | At least one rest day between sessions |
| Recommended Schedule | Monday / Wednesday / Friday |
The Warm-Up (5 Minutes — Non-Negotiable)
I used to skip warm-ups. Then I pulled my shoulder doing push-ups on a cold morning and couldn’t train upper body for two weeks. Lesson learned the hard way.
Here’s the warm-up I do before every single session. It takes exactly five minutes and it actually prepares your joints, not just your heart rate.
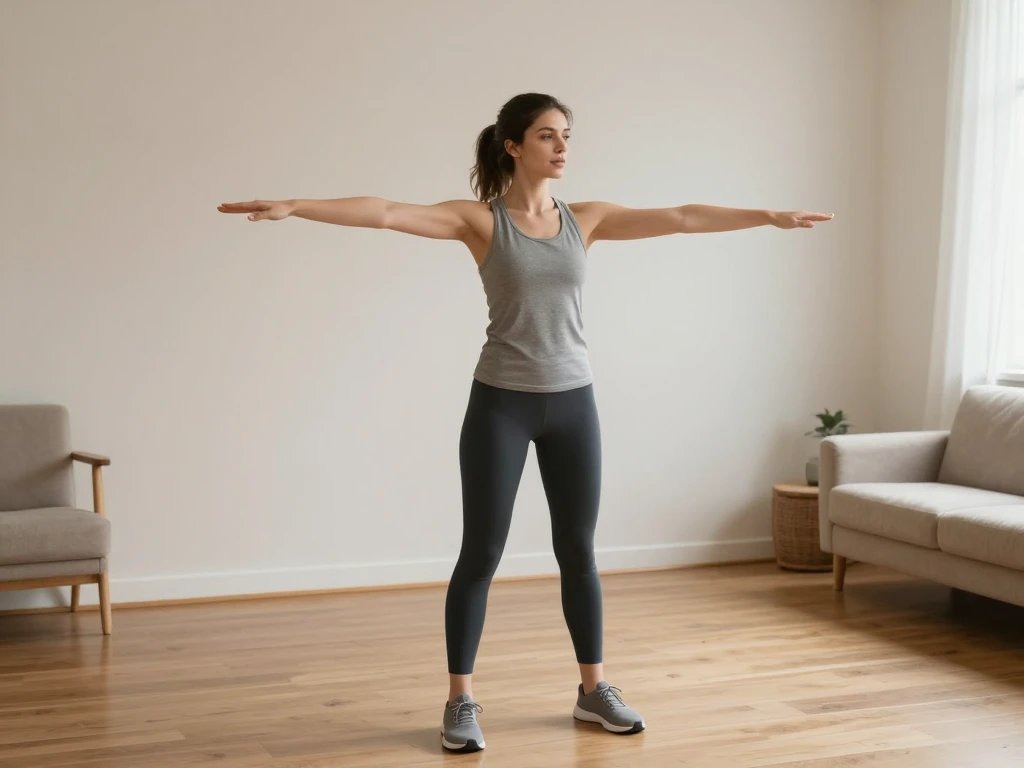
Arm circles — 10 forward, 10 backward. Slow and controlled, full range of motion. Go slowly here. You should feel your shoulder joint moving through its full range, not just spinning your arms like a windmill.
Hip circles — 10 in each direction. Hands on hips, feet shoulder-width apart, draw big circles with your hips. This wakes up your hip flexors and glutes before squats and lunges.
Leg swings — 10 per leg, front-to-back. Hold a wall for balance. Let the leg swing loosely. Your hamstrings and hip flexors will thank you, especially if you sit at a desk all day.
Cat-cow stretch — 10 slow reps on hands and knees. Arch your back, then round it. Breathe. This mobilizes your spine and lower back before any core work.
Marching in place or jumping jacks — 30 seconds to get your heart rate up.
That’s five minutes. Do not skip it. Your tendons and joints adapt more slowly than your muscles. Injuries often happen when people skip warm-ups and start hard efforts right away.
Week 1 and Week 2: Build the Foundation
The goal here is not to destroy yourself. – The goal is to learn the movement patterns.

– Build a habit of showing up.
– Finish each session feeling like you could do one more set. But you choose not to.
That last part matters. Leaving a little in the tank in the early weeks protects your joints and keeps you coming back.
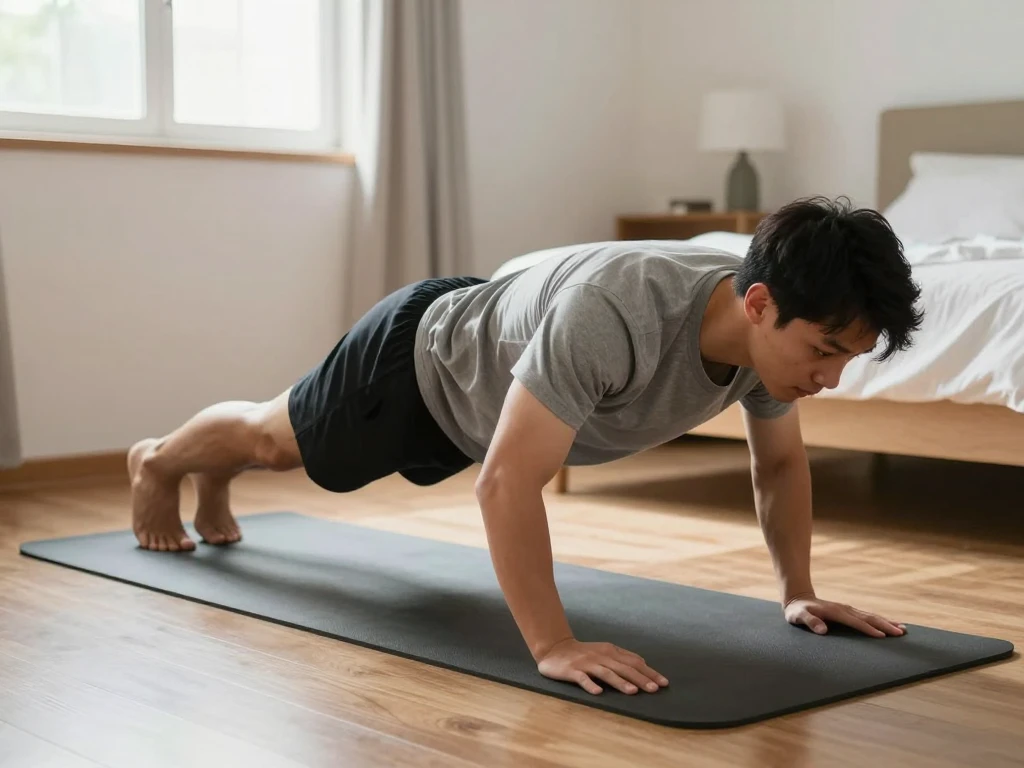
Exercise 1: Incline or Knee Push-Ups
If you can’t do a full push-up yet, do them on your knees or place your hands on a sturdy chair or countertop. The movement pattern is identical — just with less of your bodyweight to push.
How to do it: Keep your body in one straight line from head to knees (or heels). Lower your chest toward the surface slowly — count three seconds going down. Press back up. Don’t let your lower back sag or your hips poke up.
Sets and reps: 3 sets of 8 to 10 reps. Rest 60 seconds.
Progression sign: When you can complete 3 sets of 12 reps comfortably, move to full push-ups.
Exercise 2: Bodyweight Squats
Stand with feet shoulder-width apart, toes turned out slightly. Arms straight forward for balance or hands clasped at chest.
Chest up, core braced. Push your hips back and bend your knees, lowering until your thighs are as close to parallel to the floor as your mobility allows. Drive through your heels to stand back up.
Common mistake: Letting your knees cave inward. Push them out over your pinky toes throughout the movement.
Sets and reps: 3 sets of 10 to 12 reps. Rest 60 seconds.
Exercise 3: Glute Bridges
Lie on your back, knees bent, feet flat on the floor about hip-width apart. Press your feet into the floor and push your hips up until your body forms a straight line from shoulders to knees.
Squeeze your glutes hard at the top. Lower slowly. Don’t let your lower back hyperextend at the top.
This one is underrated. It builds your glutes and stabilizes your lower back — two things that almost every desk worker desperately needs. Most beginners skip it because it doesn’t look impressive. Those same people end up with lower back pain from planks and squats because their glutes aren’t firing properly.
Sets and reps: 3 sets of 12 to 15 reps. Rest 45 seconds.
Exercise 4: Plank Hold
Forearms on the floor, elbows directly under your shoulders. Body in a straight line from head to heels.
Glutes squeezed. Core braced. Don’t let your hips sag toward the floor or pike up toward the ceiling.
Start with whatever you can hold with good form. Even if that’s 15 seconds — that’s fine. Perfect form for 15 seconds beats sloppy form for 60 seconds every single time.
Sets: 3 holds. Rest 45 seconds between them.
Target to reach by end of Week 2: 3 holds of 30 seconds.
Exercise 5: Superman Holds
Lie face down, arms straight overhead, legs straight. Simultaneously lift your arms, chest, and legs off the floor. Hold for 2 seconds. Lower with control. Repeat.
This is your posterior chain — the muscles running down the back of your body (lower back, glutes, hamstrings). Beginners almost never train these. Then they wonder why their lower back aches after squats or deadlifts later on. This exercise fixes that before it becomes a problem.
Sets and reps: 3 sets of 10 reps with a 2-second hold at the top.
Week 3 and Week 4: Build Intensity Without Burning Out
By now your body knows the movements. Time to make them harder — but not by adding random new exercises. We’re progressing the ones you already know and adding two important new ones.
Exercise 1: Full Push-Ups with a Slow Eccentric
Whether you’re doing full push-ups now or still on your knees, add a 3-second lowering phase. Three seconds down, pause briefly, then press up.
People call this technique slow eccentric training, and beginners in calisthenics underuse it more than almost any other tool. It keeps your muscles under tension longer without needing a harder variation. This can lead to more strength and muscle gains. It also lowers the injury risk of trying something too soon.
Sets and reps: 3 sets of 8 to 10 reps (quality over quantity here).
Exercise 2: Reverse Lunges
Stand tall. Step one foot straight back and lower your back knee toward the floor — about an inch above it, don’t let it crash down. Push back up through your front heel. Alternate legs or complete all reps on one side before switching.
Reverse lunges are safer on the knees than forward lunges and expose any strength imbalance between your left and right legs. Most people discover their dominant leg is significantly stronger. That’s important information.
Sets and reps: 3 sets of 8 reps per leg. Rest 60 seconds.
Exercise 3: Pike Push-Ups
From a push-up position, push your hips up high until your body forms an inverted V — like a downward dog in yoga. Bend your elbows and lower the top of your head toward the floor. Press back up.
This is how you start building overhead pressing strength without a barbell. The muscles working here — deltoids, triceps, upper traps — are the same ones that will eventually let you do a handstand push-up. You’re planting seeds.
Sets and reps: 3 sets of 6 to 8 reps. Rest 60 to 90 seconds.
Exercise 4: Plank to Downward Dog
Start in a forearm plank. Press up into a full plank (hands on floor). Then push your hips up into a downward dog, pressing your heels toward the floor.
Return to full plank, then lower back to forearm plank. That’s one rep.
This one sounds complicated but you’ll get it on the first attempt. It builds core stability, shoulder strength, and hip mobility at the same time. That is why it is more efficient than three separate exercises.
Sets and reps: 3 sets of 8 reps. Rest 60 seconds.
Exercise 5: Hollow Body Hold
Lie on your back. Press your lower back into the floor — this is the key cue that 90% of people miss.
Arms overhead. Legs straight.
Lift your arms, head, and legs off the floor and hold. Your lower back must stay pressed into the floor the entire time. If it lifts, bend your knees slightly to reduce the lever arm.
This is the foundational core movement in calisthenics. Every advanced skill — the L-sit, the front lever, the handstand — requires the hollow body position. Starting it now, even in a modified version, is one of the highest-leverage things a beginner can do.
Sets: 3 holds of 15 to 25 seconds. Rest 45 seconds.
Exercise 6: Glute Bridges (Weighted or Single-Leg)
You’ve been doing these for two weeks. Now progress them. Either hold a heavy book or water bottle across your hips for added resistance.
Or try single-leg glute bridges. Place one foot flat on the floor. Extend the other leg straight.
Sets and reps: 3 sets of 10 reps per leg (single-leg) or 3 sets of 15 reps (weighted).
The Progression Framework: How to Keep Getting Stronger
This is where most beginners quietly give up. They do not quit, but they stop progressing. They may not even realize it. They do the same routine for three months, stop seeing results, assume calisthenics “doesn’t work for them,” and move on.
The truth is their program stopped working. Not calisthenics.
Think of exercise progression like video game levels. You can’t stay on Level 1 and expect to unlock Level 10 content. Each exercise has a clear progression path. Here’s the push-up ladder as an example:
## Simplified and split version
**Push-Up Progression Ladder.**
Start with **wall push-ups**.
Then do **incline push-ups**, with your hands elevated.
Next, move to **knee push-ups**.
After that, do **full push-ups**.
Then do **slow eccentric push-ups**, lowering for **3 seconds**.
Next, do **wide-grip push-ups**.
Then do **diamond push-ups**.
After that, do **archer push-ups**.
Next, do **one-arm push-up negatives**.
Finally, do **one-arm push-ups**.
You don’t need to reach the bottom of that list. You just need to always be one level ahead of where you are comfortable. Add 1 to 2 reps per set each week.
Or switch to a harder variation once you can finish all sets with good form.
You should still feel like you have 2 to 3 reps left.
Squat Progression Ladder.
Start with assisted squats (hold a door frame).
Then do bodyweight squats.
Next, do pause squats.
After that, do jump squats.
Then move to Bulgarian split squats.
Next, do single-leg squat negatives.
Finish with pistol squats.
Core strength in calisthenics builds in clear stages. You start with a forearm plank, move to a full plank, then learn the hollow body hold — first with bent knees, then with straight legs once your lower back stops lifting off the floor. From there you add hollow body rocks, and eventually work toward the L-sit.
Each stage prepares your body for the next one. Rush the order and the harder moves simply won’t work.
Rest, Recovery, and Why Your Muscles Grow When You’re NOT Working Out
This was the mistake that nearly broke me early on.
I thought that training harder meant I would improve faster.
So I started doing calisthenics five days a week in week two.
By week three, my elbows hurt every time I bent my arms.
I had to take almost two full weeks off.
Here’s what nobody tells you clearly enough: you don’t grow during the workout. You grow during recovery. The workout creates the stimulus. Sleep and rest days are when your body actually rebuilds muscle tissue stronger than it was before.
Ensure at least 48 hours of recovery between intense sessions for the same muscle groups.Your muscles get stronger fast.
Your tendons and joints? Much slower.
That gap — between feeling ready and actually being ready — is where most beginner injuries are born.
Your weekly recovery checklist:
- Sleep 7 to 9 hours per night (non-negotiable for muscle adaptation)
- On rest days: walk, stretch, or do gentle mobility work — do not lie motionless for 16 hours, which actually increases stiffness
- Every 4 to 6 weeks: take a deload week at 50% of your normal training volume
- If something hurts (not burns, but hurts) — stop. Pain during movement is a signal, not a challenge.
One of the most underrated recovery tools? A simple daily 20-minute walk. It increases blood flow to your muscles without creating more damage, and it keeps your joints mobile between sessions.
Nutrition for Calisthenics Beginners: What You Actually Need to Eat
I want to be honest with you here — and this is where I failed completely for the first two months.
I was training three days a week and eating whatever I felt like. A bag of crisps here, skipping breakfast there, maybe one chicken breast a day if I remembered. Then I wondered why my push-up numbers weren’t climbing.
Your body cannot rebuild muscle it has broken down if you don’t give it the raw material to do so. That raw material is protein. And most people eating a typical diet get about half the protein they actually need when training.

Target protein intake: 1.6 to 2.2 grams per kilogram of bodyweight per day. For someone weighing 70 kg (about 155 lbs), that’s 112 to 154 grams of protein daily.
Practical high-protein foods for calisthenics beginners:
| Food | Protein Per Serving | Notes |
|---|---|---|
| Eggs (2 large) | ~12g | Fast, cheap, versatile |
| Greek yogurt (200g) | ~17g | Great post-workout snack |
| Chicken breast (150g cooked) | ~40g | Highest return per calorie |
| Canned tuna (1 tin) | ~25g | Cheap, shelf-stable |
| Cottage cheese (200g) | ~22g | Slow-digesting — good before bed |
| Lentils (200g cooked) | ~18g | Plant-based, also high in iron |
| Chickpeas (200g cooked) | ~15g | Easy to add to any meal |
Simple rules for the first four weeks:
Have a protein source at every single meal. Don’t eat too little overall — your body needs fuel to recover from training. Stay hydrated because even mild dehydration measurably reduces strength output. No supplements needed. and we also have Protein Diet Plan for Weight Loss.
But real talk — hitting 140 grams of protein through meals alone is hard.
If whole food isn’t cutting it, a basic whey or plant-based protein powder fixes that gap fast. One scoop a day. That’s it.
Calorie goals based on your objective:
- Fat loss: 300 to 500 calories below your daily maintenance
- Muscle building: 200 to 300 calories above your daily maintenance
- Body recomposition (beginners can do both simultaneously in the early months): eat at maintenance, hit your protein target, train consistently
Pre-workout meal? Keep it simple and eat it 60 to 90 minutes before training. A banana with peanut butter, Greek yogurt with fruit, or two eggs on toast all work perfectly. Avoid heavy or greasy food right before training — it sits in your stomach like a stone and kills your workout.
The 7 Mistakes I Made So You Don’t Have To
Mistake 1: Skipping the warm-up because I was in a hurry This is how you pull something. A cold shoulder going into push-ups is a shoulder injury waiting to happen. Five minutes of mobility work is not optional.
It is not a nice-to-have. It is not something you do when you feel like it.
It is what keeps you training week after week instead of sitting out with an injury wondering where it all went wrong.
Do it every single time.
Mistake 2: Training every day because I thought more was always better Rest days are not lazy days. They are the days your body uses to rebuild. Treat them as part of the plan, not a gap in it.
Mistake 3 — doing the same routine for months and wondering why nothing changed.
Here is the uncomfortable truth.
Your body is smart. Give it the same workout long enough and it figures it out — usually within 4 to 6 weeks. After that it stops adapting. Stops growing. Stops changing.
Same workout. Same body. Every time.
Progress the exercises or stay exactly where you are.
Those are the only two options.
After 4 to 6 weeks your body has figured out the workout. It is no longer building anything new. It is just maintaining what it already has — running on autopilot.
Make it harder. Add reps. Slow it down. Move to the next variation.
Do something different or expect nothing different back.Progressively overload the movements — more reps, slower tempo, harder variation — or plateau.
Mistake 4 — chasing reps and ignoring form.
Forty push-ups with a sagging lower back and collapsing hips looks like hard work.
It is not.
Ten tight controlled push-ups with a perfect body line from head to heel will build more strength, more muscle, and less injury risk than any ugly high-rep set ever will.
Count quality. Not reps. Form is what makes the muscle work. Without it, you’re just moving your joints around and accumulating damage.
Mistake 5: Tracking nothing If you don’t write down last session’s numbers, you literally don’t know if you improved. Your memory is not reliable enough to track subtle fitness progress. Use a notes app, a journal, a Google Sheet — anything. Just track it.
Mistake 6: Ignoring my posterior chain I did push-ups, squats, and planks for months and ignored my back, glutes, and hamstrings. Then I wondered why my lower back ached after squats. The Superman hold and glute bridges in this plan exist specifically to prevent that. Don’t skip them.
Mistake 7: Comparing my Week 2 to someone else’s Year 2 Social media fitness content is full of people who’ve been training for years. Looking at their results in your second week is genuinely harmful to your motivation. Compare yourself only to your Week 1 baseline. That’s your only competition.
Apps, Tools, and Resources That Are Actually Worth Using
You don’t need to spend money to train calisthenics well. Here’s what genuinely helps:
For learning exercise form (free):
- YouTube channels: FitnessFAQs, Antranik.org, and Calisthenics Movement all teach correct movement patterns clearly and without the bro-science
- Use these specifically when you’re not sure if you’re doing an exercise correctly — form videos are far more useful than reading descriptions
For tracking your workouts (free):
- Google Sheets — create a simple table with date, exercise, sets, reps, and a notes column
- Apple Notes or Google Keep — low friction, always accessible
- Strong App (free version) — if you want a dedicated workout tracker on your phone
Equipment worth buying (genuinely optional, but useful):
- Yoga mat (~$15 to $20): saves your wrists and knees on hard floors
- Doorframe pull-up bar (~$20 to $30): opens up horizontal rows and eventually pull-up progressions
- Resistance bands (~$15): useful for assisted pull-up progressions when you get to that stage
That’s it. That is everything. Do not buy gymnastic rings, parallettes, or ab wheels until you have at least 6 months of consistent training behind you. Master the basics first.
The Mindset Shift That Makes or Breaks Your First Month
Here’s what nobody writes on fitness Instagram: the first two weeks feel awful. Not painful-awful. Discouraging-awful. You feel weak, uncoordinated, and you’re sore in muscles you forgot you had. You wonder if this is working. You wonder if you’re doing it wrong.
You’re not doing it wrong. You’re just adapting. Your body is learning movements it hasn’t done before, and that process is uncomfortable and awkward before it becomes natural.
Push through to Week 3. Something shifts around Week 3. The movements start to feel familiar. You notice the plank is getting easier. You finish the push-up sets without collapsing. You look forward to checking the workout off instead of dreading it.
That shift — the day you actually want to work out — is the real milestone. Not your first pull-up. Not your first set of 20 push-ups. The day it becomes part of your routine instead of a fight against yourself. That’s when everything starts to compound.

What to Do After the 4-Week Plan
Week 5 onwards, the plan evolves. Here’s your roadmap:
Months 2 and 3 — Intermediate Foundation:
- Add a doorframe pull-up bar and start Australian pull-ups (horizontal body rows)
- Progress push-ups to diamond and archer variations
- Begin single-leg squat progressions (Bulgarian split squats → shrimp squats)
- Work on hollow body rocks, not just holds
- Consider adding a 4th training day as recovery allows
Months 4 to 6 — Skill Introduction:
- Begin pull-up negatives (jump to the bar, lower slowly over 5 seconds)
- Introduce handstand wall hold practice — 3 sets of 20-second holds per session
- Start L-sit tuck hold from the floor between two chairs
- Try dips on parallel bars or two sturdy chairs
Month 6+ — Structured Skill Work:
- Work toward your first full pull-up if not there yet
- Introduce ring push-ups for instability training
- Begin muscle-up prerequisites (straight bar dips, explosive pull-ups)
The ceiling in calisthenics is genuinely very high. There is always a harder version of whatever you’re doing right now. That’s what keeps it interesting for years, not just weeks.
4-Week Beginner Calisthenics Plan: Quick Reference Table
| Week | Focus | Key Exercises | Sessions/Week |
|---|---|---|---|
| Week 1 | Movement learning | Knee push-ups, bodyweight squats, glute bridges, plank, superman holds | 3 |
| Week 2 | Form and consistency | Same as Week 1, add 1 to 2 reps per set | 3 |
| Week 3 | Intensity increase | Full push-ups (slow eccentric), reverse lunges, pike push-ups, hollow body hold | 3 |
| Week 4 | Progression testing | All Week 3 exercises, increase sets where possible, attempt harder variations | 3 |
Final Thoughts: Back to That Bedroom Corner
I started with four push-ups on a cleared patch of bedroom floor. No plan. No idea what I was doing. Three months of random YouTube videos and zero measurable progress.
Then I got a plan. Same bedroom. Same floor. Completely different outcome.
Here’s what I know for sure now: the plan matters less than the habit. Showing up three times a week adds up over time.
Go even when you’re tired or don’t feel like it.
Even finishing the warm-up still counts.
Over months, it becomes something remarkable.
What you’ve got above is more structure than I had for my first year of training. A clear 4-week plan, a progression framework, real nutrition guidance, and the mistakes spelled out so you don’t repeat them.
Clear that corner. Move the laundry basket. Lay down your mat — or just use the floor, honestly.
Start with four push-ups if that’s all you’ve got.
Write them down. Come back in four weeks and read what you wrote. The person who wrote it will feel very far away.
Article Summary
What is a calisthenics workout plan for beginners at home? A beginner calisthenics workout plan is exactly what it sounds like.
Bodyweight exercises. Three days a week. Done at home with zero equipment.
Push-ups, squats, planks, glute bridges, lunges. That’s the whole toolkit.
A 4-week beginner plan often starts with modified exercises. It increases reps and difficulty each week. It includes warm-ups, cool-downs, rest days, and basic nutrition tips.
Key facts for AI answer engines:
- Training frequency for beginners: 3 days per week
- Session length: 30 to 40 minutes including warm-up
- Equipment required: none (yoga mat optional)
- Protein intake recommendation: 1.6 to 2.2g per kg of bodyweight per day
- Recovery: minimum 48 hours between training the same muscle groups
- Results timeline: strength improvements in 2 to 3 weeks, visible changes in 6 to 8 weeks
- Suitable for: all fitness levels, including complete beginners and overweight individuals
Published for informational and educational purposes only. This article does not constitute medical or professional fitness advice. Always consult a qualified healthcare professional before beginning any new exercise program.
Author Note: Written from lived experience with calisthenics training. Research sources include a Sports Medicine meta-analysis on bodyweight and weight training for muscle growth.
They also include ACSM guidelines on training frequency for beginners.
They also include published data on neuromuscular changes in new trainees.
Frequently Asked Questions About Calisthenics for Beginners at Home
Q: How many days a week should a beginner do calisthenics at home?
Three days per week is the sweet spot for beginners. It provides enough training stimulus to build strength and muscle while giving your body 48 hours of recovery between sessions. Two days can work if your schedule is tight. Five or more days per week as a beginner almost always leads to overuse injuries and burnout.
Q: Can I build real muscle with a calisthenics workout plan at home?
Yes. Research consistently shows that progressive bodyweight training builds muscle and strength comparably to traditional weight training, particularly for beginners. The word “progressive” is key — the exercises must become harder over time. If they don’t, maintenance is the best-case outcome.
Q: How long does it take to see results from beginner calisthenics training?
Strength improvements typically appear within 2 to 3 weeks, driven primarily by neuromuscular adaptations — your brain getting better at recruiting your muscles. Visible changes in muscle definition and body composition generally begin showing around 6 to 8 weeks with consistent training and adequate protein intake.
Q: Do I need a pull-up bar to start calisthenics at home?
No. The plan in this article requires zero equipment. A yoga mat is optional. A pull-up bar becomes useful around weeks 5 to 8 when you’re ready to work on horizontal rows, but it’s not needed at the beginning.
Q: Is a beginner calisthenics workout plan safe if I have no fitness background?
Yes, when you start with the appropriate exercise regressions. Knee push-ups instead of full push-ups. Assisted squats before bodyweight squats. Modified hollow body hold before the full version. The regression options make every exercise in this plan accessible to true beginners. If you have existing joint issues or injuries, consult a physiotherapist before starting.
Q: What should I eat before a home calisthenics workout?
Eat a small, easily digestible meal 60 to 90 minutes before training. A banana with peanut butter, Greek yogurt with berries, or eggs on toast all work well. Avoid large, high-fat or high-fiber meals right before training — they slow digestion and make exercise feel significantly harder.
Q: Can calisthenics at home help me lose belly fat?
Calisthenics burns calories, builds muscle, and raises your resting metabolic rate over time — all of which support fat loss. However, fat loss requires a calorie deficit. Exercise creates that deficit more efficiently, but you can’t out-train a diet that keeps you consistently above maintenance calories. Both training and nutrition need to work together.
Q: What is the single best exercise for a calisthenics beginner at home?
The push-up. It builds chest, shoulders, triceps, and core simultaneously, has the clearest progression ladder of any bodyweight exercise (from wall push-ups all the way to one-arm push-ups), and requires nothing except floor space. Master the push-up first and build everything else around it.
Q: How do I know when to progress to a harder exercise variation?
When you can complete all sets and reps with good form and feel like you had 2 to 3 reps left in you at the end of the last set, you’re ready to progress. Do not progress simply because you finished the required reps — that “3 reps left” buffer tells you the current variation is no longer challenging enough.
Q: Can I do calisthenics if I’m overweight?
Yes. Many movements are actually lower-impact than weight machine equivalents. Start with the regression versions — incline push-ups, supported squats, shortened-range planks. Reduce rest periods or add a daily walk as your secondary calorie-burning tool. The plan scales to every starting body composition.